
.
...
An ExcelWriter template is an Excel file that contains ExcelWriter data markers. A data marker is a cell value beginning with %%= that specifies a database columcolumn, variable, or array to insert into the spreadsheet column. Data markers are added to a worksheet in Excel and then bound to data sources in code. ExcelWriter populates the data markers with values from the data sources when the code is executed.
| Info |
|---|
ExcelWriter templates do not necessarily need to be in the Excel template file format are typically created as standard Excel files (XLS, XLSX, XLSM), although "template" formats (XLT, XLTX, XLTM) , although these formats are also supported by ExcelWriter. |
...
The basic syntax for a data marker is %%=[DataSourceName].[ColumnName], where DataSourceName is the name of the data source and ColumnName is the name of the column of data in the data source. You need to follow these rules when naming data markers:
%%=[Data Source Name].ColumnName, %%=DataSourceName.[Column$Name]) ]) are optional, but must be used when the data marker contains spaces or Unicode characters ColumnName must be [Street Address] to account for the space. Similarly, if a data source name is "DataSource1", the data marker name must be DataSource1 or [DataSource1]....
| Info |
|---|
In the sample code, the completed template file is located in SimpleExpenseSummary/templates/part1_template.xlsx |
1. Start with a blank .xlsx file. Save the file as template.xlsx.
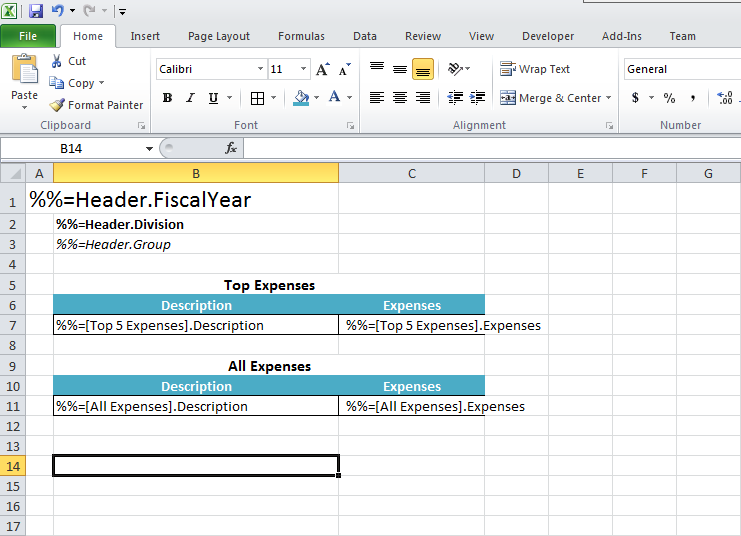
2. Add some text placeholders for data markers and table headers. In At the header top of the worksheet, we will display the fiscal year, the company division and group. Below will be 2 tables: one to show the top 5 expenses and another to show all the expenses.
In the screen shot, Fiscal Year, Division, and Group will replaced by data markers. Top Expenses, All Expenses, Description, and Expenses are going to will become table column headers. The data markers for that data will go in the rows below.
...
3. Replace Fiscal Year, Division, and Group with data markers. These values are going to will be a single row of a data set called "Header". The column names will be "FiscalYear", "Division" and "Group".
4. Next add data markers for Top Expenses and All Expenses:
...
| Info |
|---|
Data markers take the formatting and style properties of the cell that they are in. This means if a data marker is bold, then the value that replaces the data marker will be bold as well. |
5. In the screen shot below we have made the %%=Header.FiscalYear cell font size 18, %%=Header.Division is bold, and %%=Header.Group is italic.
...
| Info |
|---|
When importing multiple rows of data, ExcelWriter will insert a new row in the worksheet for each row of data, starting from the row with the data markers. Each of the new rows will take on the styles and formatting of the cells that contain the data markers. For more details on this behavior see How ExcelWriter Inserts Rows. |
6. Since the 'Expenses' data will be currency values, add a currency number formatting to the cells containing the Expenses data markers. This number formatting will be repeated for each row of data that is inserted.
...
7. Add some borders to the cells in the Top Expenses and All Expenses tables. Then format the table column headers as desired. Below is a screen shot of the final imagetemplate:
We're done creating the template. Now it's time to write the code.
...
| Info |
|---|
In the sample code, the a sample web application page |
1. Include the SoftArtisans.OfficeWriter.ExcelWriter namespace in the code behind
| Code Block |
|---|
using SoftArtisans.OfficeWriter.ExcelWriter; |
2. In the method that is going to will actually run the report, instantiate the ExcelTemplate object.
...
3. Open the template file from earlier with the ExcelTemplate.Open method.
...
4. Create a DataBindingProperties object. Although we won't be changing any of the binding properties, a DataBindingProperties is a required parameter in all ExcelTemplate data binding methods.
| Code Block |
|---|
DataBindingProperties dataProps = XLT.CreateDataBindingProperties(); |
5. Create a an object array for the header values and a string array for the column names.
ExcelTemplate can be bound to numerous types of .NET data structures: single variables, arrays (1-D, jagged, multi-dimensional), DataSet, DataTable, IDataReader etc. The source of the data can come from anywhere.
...
| Code Block |
|---|
//This report is for FiscalYear: FY 2004, Division: Canadian Division, Group: Research and Development
object[] valuesArray = { "FY 2004", "Canadian Division", "Research and Development" };

//The column names are FiscalYear, Division, Group
string[] columnNamesArray = { "FiscalYear", "Division", "Group" };
|
6. Use the ExcelTemplate.BindRowData method to bind the header data to the data markers in the template file (%%=Header.FiscalYear, %%=Header.Division, %%=Header.Group).
BindRowData() binds a single row of data to the template, but the data markers in the template do not need to be in a single row.
| Code Block |
|---|
XLT.BindRowData(valuesArray, columnNamesArray, "Header", dataProps); |
| Info |
|---|
If you want to import a row of data as a vertical column in Excel, you need to use |
...
In this case, we chose to parse CSV files that contained contain query results from the AdventureWorks2008 database to make running the sample code easier. These calls are to a helper method GetCSVData that parses the CSV files and returns a DataTable with the values.
| Code Block |
|---|
DataTable dtTop5 = GetCSVData(Page.MapPath("//data//Part1_Top5Expenses.csv"));
DataTable dtAll = GetCSVData(Page.MapPath("//data//Part1_AllExpenses.csv"));
|
8. Use ExcelTemplate.BindData to bind the data for the Top 5 Expenses and All Expenses data sets.
...
Note: The formatting has been applied to the values that replaced the data markers, including the data sets with multiple rows. Also note that the Top 5 Expenses and All Expenses tables have expanded to accomodate accommodate the new rows of data (i.e. All Expenses was pushed down when the Top 5 Expenses data was imported).
...