Word Export Plus Introduction
Word Export Plus is a SharePoint solution that demonstrates a usage of the OfficeWriter API in SharePoint. This solution adds a new context menu button to list items, allowing you to export the list data to a pre-formatted Word template that can be designed yourself in Word, or automatically generated by Word Export Plus.
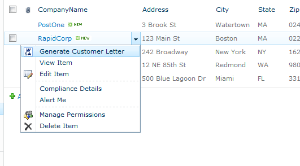
The "Generate Customer Letter" menu item below is an example of a Word Export Plus button. You can customize the button text based on your requirements.
How it Works
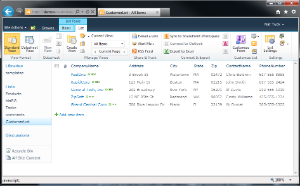
Word Export Plus uses the OfficeWriter API under SharePoint's hood to merge SharePoint list item data into a Word document. For example, say you have a list like this one, with CompanyName, Address, City, State, Zip, ContactName, and PhoneNumber columns:
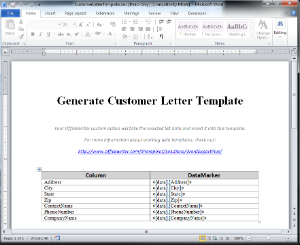
You could design a template like the one shown below in Word. Put anything you want into the Word document, and insert merge fields that correspond to the names of the columns in the list.
When you choose to export the list item from the context menu, Word Export Plus pulls the values from the list item you selected, and then uses OfficeWriter to open the template file, replace the merge fields with actual data, and stream it to the browser:

Fully Customizable By Developers
You can install OfficeWriter and Word Export Plus and use it as-is, customize the code to fit your own needs, or simply use it as an educational tool to better understand the capabilities of OfficeWriter.
Installation and Configuration
Installation
The first step is to install OfficeWriter and Word Export Plus on the SharePoint web farm.
Prerequisites and System Requirements
The following is a list of prerequisites for this solution installer.
To run the solution installer:
- OfficeWriter Enterprise key - An Enterprise key is required to use an OfficeWriter SharePoint solution. If you do not have an enterprise license key, you can obtain a free 30-day evaluation by visiting http://www.officewriter.com or by contacting SoftArtisans at contact@softartisans.com.
- SharePoint 2010 - This solution is supported only on SharePoint 2010
- Local machine administrative privileges - The installer must be run with local administrative privileges
- Farm administrator privileges - The installer requires farm administrator privileges to run
Installation
All installation steps are assumed to occur on the machine where the SharePoint web app resides.
- Install OfficeWriter - If you haven't already, install the OfficeWriter product. If you don't have the OfficeWriter product already installed, you can download an evaluation copy by visiting http://www.officewriter.com or by contacting SoftArtisans at contact@softartisans.com.
- Install the solution on the farm - Run the Word Export Plus installer. This will install the solution into the SharePoint farm.
- Deploy the solution - Once the solution is on the SharePoint farm, deploy it by following these steps:
- Navigate to "System Settings" > "Farm Management" > "Manage Farm Solutions"
- Click "Word Export Plus.wsp"
- Click "Deploy Solution"
- Specify a deployment time
- Click "OK"
Configuration
Feature Activation
Once the Installation steps are complete, the solution will appear as a SharePoint Feature that can be activated and managed by a site administrator. Follow these steps to configure Word Export Plus:
- Browse to the SharePoint site in which you want to use this solution.
- Under the "Site Actions" menu, select "Site Settings."
- Select "Manage site features" in the "Site Actions" section.
- Locate the "OfficeWriter Solution Gallery - Word Export Plus" item, and click "Activate." When it has been activated, it will look like this:

Defining Export Settings
In this step, you will enable the Word Export Plus button on a specific list item, select or create a template file that it will export the item's content to, and define the text for the context menu item.
- From "Site Settings", click "OfficeWriter Solution: Word Export Plus" in the "Look and Feel" section. This will bring up a configuration screen.
- In the "SharePoint List" section, click "Browse..." and choose a list in your site on which you want to activate Word Export Plus.
- In the "Word Template" section, select "Create a new template file", and then choose the columns from the list that you want to appear in the export. Word Export Plus will automatically create a document for you with the merge fields that you choose (you can go back later and customize the template in Word). You can also select a previously created template that you've uploaded to any library in the SharePoint site.
- If creating a new template, specify a document library in which you want to hold the new template.
- Type a name for the new template file
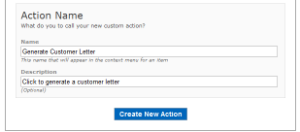
- Finally, in the "Action Name" section specify the text you want to appear on the context menu item, and provide a (optional) description.
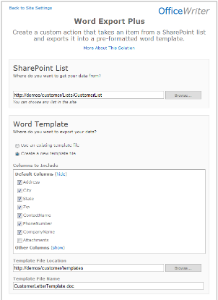
Here is an example of the configuration screen for the sample list described above:
Doing More with OfficeWriter
Now that you have your list associated with a template file in the document library, you can edit the template and add more formatting, content, or merge fields that correspond to column names in the list.
For more information about template files, see here:
http://wiki.softartisans.com/display/WW40/Creating+a+Template
