Saving your report and publishing it are two different things. Saving The OfficeWriter Designer Save option allows the user to either save a local copy to disk, or deploy to a remote server:
 Image Added
Save to Disk will save a copy of the report definition file locally. Publishing Deploy to Remote Server will copy and deploy the file to the Reporting Services server . After you publish, open the Reporting Services Report Manager (Usually http://<MyReportServer>/Reports). You will see your report with other published reports. From the Report Manager you change Reporting Services report settings (security, etc.).Before publishing the report on the Reporting Services server, you must save the template locally as an RDL file:where it will be available for renderering.
Saving your report to disk
- From the OfficeWriter Designer toolbar select Save As > Save to Disk.
- # Navigate to a local folder where you will store the template report file. This will be where you store your work file in case you want to edit it later, not a location on the Reporting Services server.
#
- Save the template as an RDL file.
To publish your report:
| Info |
|---|
If you want to render the report in a specific format (DOC, DOCX, DOCM), you will need to use the Save to Disk option to set the file format for the Excel report in the RDL. However, you will only need to do this once to set the file format, unless you decide to change the file format later. The file format options for Save to Disk are: - Office 2003 exports to DOC
- Office 2007 exports to DOCX
- Office 2007 with macros exports to DOCM
|
Deploying your report to a report server
- From the OfficeWriter Designer, select Publish Save > Deploy to a Remote Server. The Publish Report dialog will open.
!ww_publish1.jpg!
#
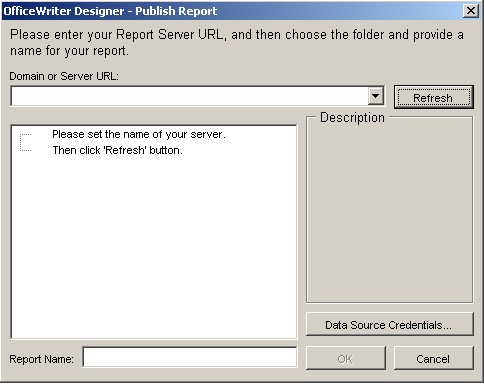 Image Added
- In the Domain or Server URL field, enter the path to your Reporting Services server (for example http://MyReports/ReportServer).
#
- Click Refresh. OfficeWriter will display the folders available on the server.
- Navigate to the destination folder for your report.
- # In the Report Name field (at the bottom of the Publish Report dialog), enter a name for your report.
- # Optional: Click Data Source Credentials to specify how the report will link to the data. You may also do this from the Reporting Services Report Manager after you publish your report. See the Reporting Services documentation for the meaning of the different data source credentials options.
#
- Click Ok. If your report was already published on the server, you will be asked to overwrite it. When the report is published, you will receive a message box telling you that publishing was successful.
!ww_publish2.jpg!
\
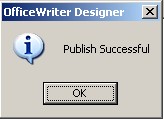 Image Added
You are now ready to view your report.
