Setting up the Template
About templates and data markers
An ExcelTemplate template is an Excel file that contains ExcelWriter data markers. A datamarker is a cell value beginning with %%= that specifies a database colum, variable, or array to insert into the spreadsheet column. Data markers are added to a worksheet in Excel and then bound to data sources in code. ExcelWriter populates the data markers with values from the data sources when the code is executed.
Datamarker syntax
The basic syntax for a datamarker is %%=DataSourceName.ColumnName, where DataSourceName is the name of the data source and ColumnName is the name of the column of data in the data source. You need to follow these rules when naming data markers:
- Names MUST begin with a letter (A-Z, a-z)
- Spaces and Unicode characters are NOT allowed unless the names are inside brackets (
%%=[Data Source Name].ColumnName,%%=DataSourceName.[Column$Name])- The following is a list of characters allowed in data marker names without brackets: ABCDEFGHIJKLMNOPQRSTUVWXYZabcdefghijklmnopqrstuvwxyz1234567890_
- Names must match the names in the data source exactly.
- If a column in a database is 'Street Address', the ColumnName must be
[Street Address]to account for the space. Similarly, if a data source name is "DataSource1", the data marker name must beDataSource1or[DataSource1].
- If a column in a database is 'Street Address', the ColumnName must be
Adding data markers to the the template
The final template will look something like this:
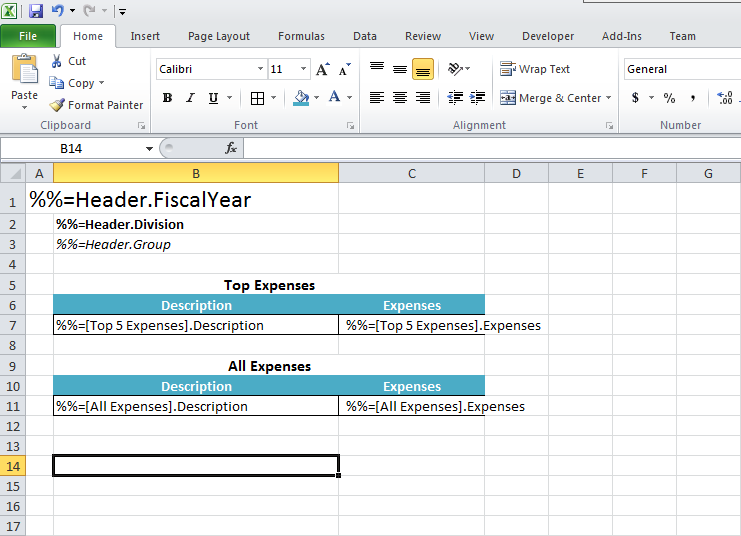
1. Start with a blank xlsx file. Save the file as template.xlsx.
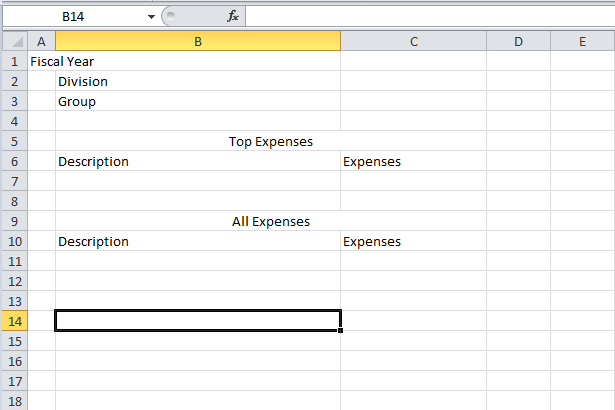
2. Add some text placeholders for data markers and table headers. In the header of the worksheet, we will display the fiscal year, the company division and group. Below will be 2 tables: one to show the top 5 expenses and another to show all the expenses.
In the screen shot, Fiscal Year, Division, and Group will replaced by data markers. Top Expenses, All Expenses, Description, and Expenses are going to become table headers. The data markers for that data will go in the rows below.
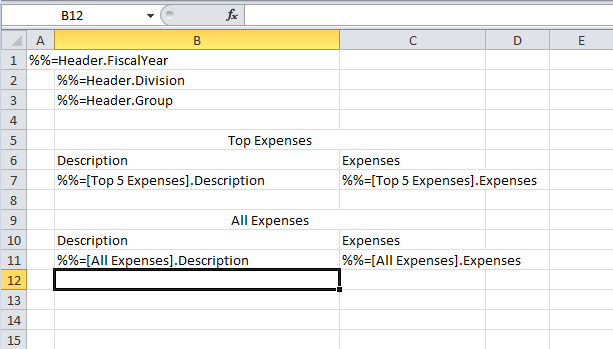
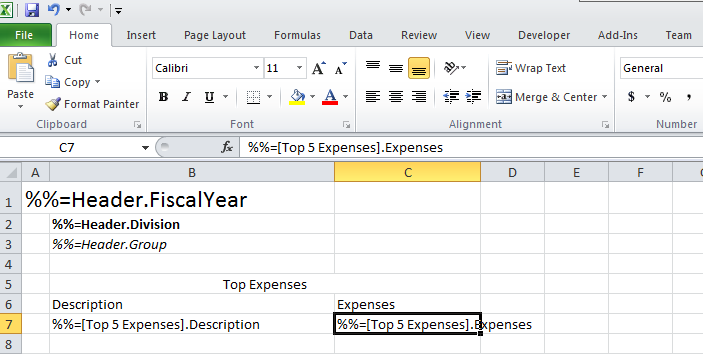
3. Replace Fiscal Year, Division, and Group with data markers. These values are going to be a single row of a data set called "Header". The column names will be "FiscalYear", "Division" and "Group".
4. Next add data markers for Top Expenses and All Expenses:
- The data set name for Top Expenses will be "Top 5 Expenses" with column names "Description" and "Expenses".
- The data set name for All Expenses will be "All Expenses" with the same column names.
- Since the data source names have spaces, the data markers need to be in brackets.
We're done adding the data markers, so next we'll add some styles and formatting to the data markers.
Formatting cells with data markers
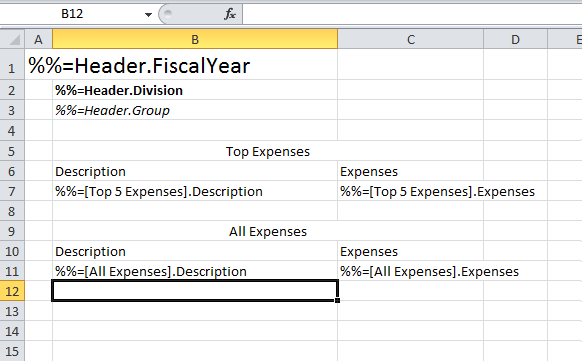
5. In the screen shot we have made the %%=Header.FiscalYear cell font size 18, %%=Header.Division is bold, and %%=Header.Group is italic.
.
6. Since 'Expenses' will be currency values, add a currency number formatting to the cells containing the Expenses data markers. This number formatting will be repeated for row of data that is inserted.
7. Add some borders to the cells in the Top Expenses and All Expenses tables. Then format the table headers as desired. Below is a screen shot of the final image:

We're done creating the template. Now it's time to write the code.
Writing the Code
SOMETHING ABOUT BINDROWDATA and BINDCOLUMN DATA
