You are viewing an old version of this page. View the current version.
Compare with Current
View Page History
Version 1
Next »
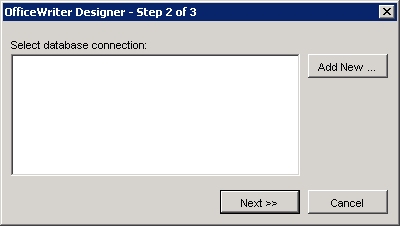
The Step 2 of 3 dialog is the second step in the process of building a query to add to your report. In this dialog, you will select a saved database connection or create a new connection.
To select a saved database connection:
- Select Add Query from the toolbar.
# In the Step 1 of 3 dialog, type in a name for the query (or leave the default name). Click Next.
# In the Step 2 of 3 dialog, select a connection from the list and click Next.
To create a new database connection
- Select Add Query from the toolbar.
# In the Step 1 of 3 dialog, type in a name for the query (or leave the default name). Click Next.
# In the Step 2 of 3 dialog, click Add New. Microsoft Query will open.
# Select New Data Source and click Ok.
# Enter a name for the data source.
# Click the down arrow on the right side of the step two box and find the SQL Server driver.
# At the step 3 line, press the Connect button.
# In the SQL Server Login dialog, pull down the Server list with the down arrow and choose the server on which the database resides.
# Click Options.
# From the database drop-down list, find the database and select it. Click Ok.
# You will now see your data source in the list. Make sure it is selected and click Next.
See Also
Create Your First Word Report
Creating a New Template Report

