Table of Contents |
|---|
Setting up the Template
About templates and data markers
An ExcelWriter template is an Excel file that contains ExcelWriter data markers. A data marker is a cell value beginning with %%= that specifies a database column, variable, or array to insert into the spreadsheet column. Data markers are added to a worksheet in Excel and then bound to data sources in code. ExcelWriter populates the data markers with values from the data sources when the code is executed.
Data marker syntax
The basic syntax for a data marker is %%=[DataSourceName].[ColumnName], where DataSourceName is the name of the data source and ColumnName is the name of the column in the data source. You need to follow these rules when naming data markers:
- Names must begin with a letter (A-Z, a-z)
- The brackets (
[]) are optional, but must be used when the data marker contains spaces or Unicode characters- The following is a list of characters allowed in data marker names without brackets: ABCDEFGHIJKLMNOPQRSTUVWXYZabcdefghijklmnopqrstuvwxyz1234567890_
- Names must exactly match the names in the data source.
- If a column in a database is 'Street Address', the
ColumnNamemust be[Street Address]to account for the space. Similarly, if a data source name is "DataSource1", the data marker name must beDataSource1or[DataSource1].
- If a column in a database is 'Street Address', the
For more specific information about creating data markers, see Creating Data Markers
Adding data markers to the the template
The final template will look something like this:
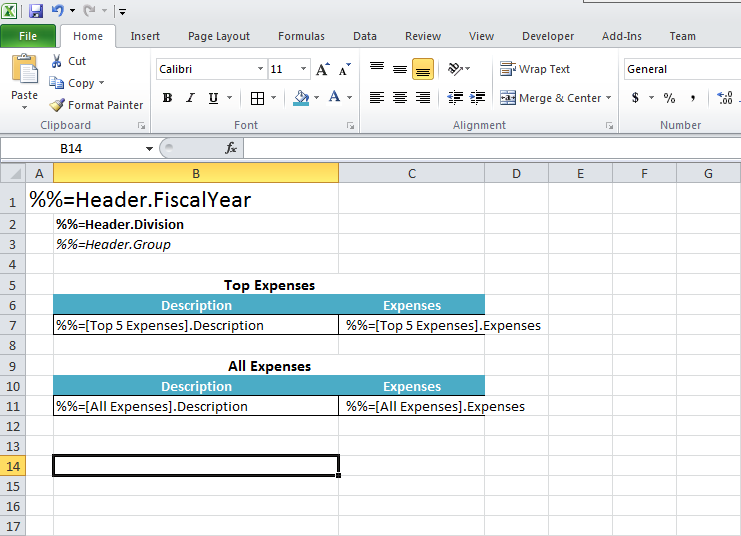
Note: At the top of the worksheet, we will display the fiscal year, the company division and group. Below will be 2 tables: one to show the top 5 expenses and another to show all the expenses.
1. Start with a blank .xlsx file. Save the file as template.xlsx.
2. Add some data markers for Replace Fiscal Year, Division, and Group. These values will be a single row of a data set called "Header". The column names will be "FiscalYear", "Division" and "Group".
3. Next add data markers for Top Expenses and All Expenses, which will be table header columns:
- The data source name for Top Expenses will be "Top 5 Expenses" with column names "Description" and "Expenses".
- The data source name for All Expenses will be "All Expenses" with the same column names.
- Since the data source names have spaces, the data markers need to be in brackets.
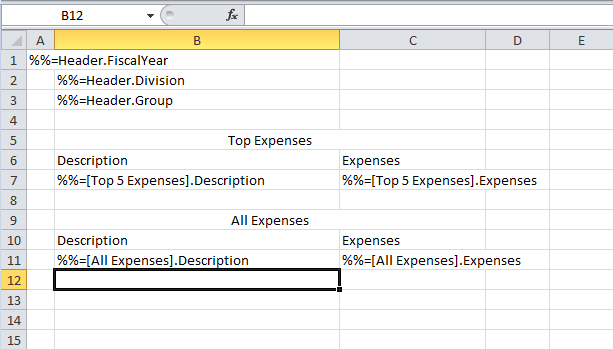
We're done adding the data markers, so next we'll hook the template up to some data before we do any formatting.
Adding an ExcelWriter Reference in Visual Studio
Create a .NET project and add a reference to the ExcelWriter library.
- Open Visual Studio and create a .NET project.
- The sample code uses a web application.
- Add a reference to SoftArtisans.OfficeWriter.ExcelWriter.dll
- SoftArtisans.OfficeWriter.ExcelWriter.dll is located under Program Files > SoftArtisans > OfficeWriter > dotnet > bin
Writing the Code
1. Include the SoftArtisans.OfficeWriter.ExcelWriter namespace in the code behind
2. In the method that will actually run the report, instantiate the ExcelTemplate object.
3. Open the template file with the ExcelTemplate.Open method.
4. Create a DataBindingProperties object. Although we won't be changing any of the binding properties, a DataBindingProperties is a required parameter in all ExcelTemplate data binding methods.
5. Create an object array for the header values and a string array for the column names.
ExcelTemplate can be bound to numerous types of .NET data structures: single variables, arrays (1-D, jagged, multi-dimensional), DataSet, DataTable, IDataReader etc. The source of the data can come from anywhere.
Some of the aforementioned structures have built in column names, such as the DataTable. When working with arrays, which don't have built in column names, you have to define the column names in a separate string array.
6. Use the ExcelTemplate.BindRowData method to bind the header data to the data markers in the template file (%%=Header.FiscalYear, %%=Header.Division, %%=Header.Group).
BindRowData() binds a single row of data to the template, but the data markers in the template do not need to be in a single row.
7. Get the data for the Top 5 Expenses and All Expenses data sets.
These calls are to a helper method GetCSVData that parses the CSV files and returns a DataTable with the values.
If you are following in your own project and would like to parse the CSV files as well, you will need to:
- Add a reference to
GenericParsing.dll - Include
GeneringParsingat the top of your code. - Add the
GetCSVDatamethod that can be found in the sample code.
8. Use ExcelTemplate.BindData to bind the data for the Top 5 Expenses and All Expenses data sets.
Recall that the data source names ([Top 5 Expenses], [All Expenses]) need to match the data marker names exactly.
9. Call ExcelTemplate.Process() to import the data into the file.
10. Call ExcelTemplate.Save to save the output file.
ExcelTemplate has several output options: save to disk, save to a stream, stream the output file in a page's Response inline or as an attachment.
11. Run your code.
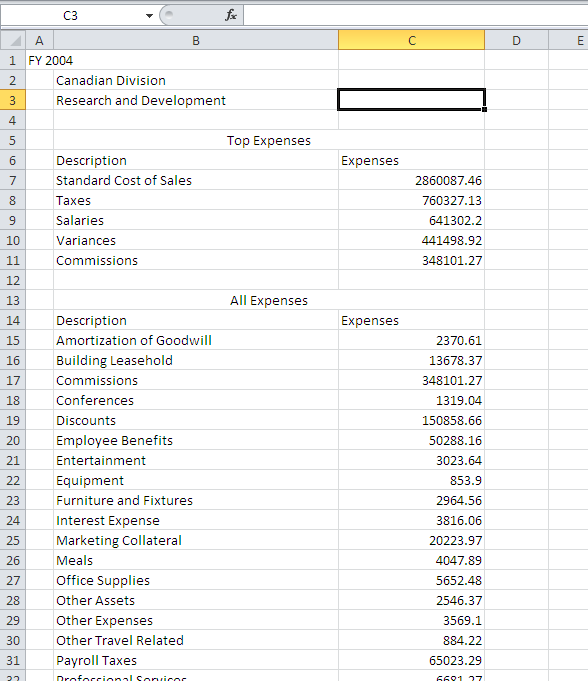
Here is an example of the output from the sample code:
Formatting cells with data markers
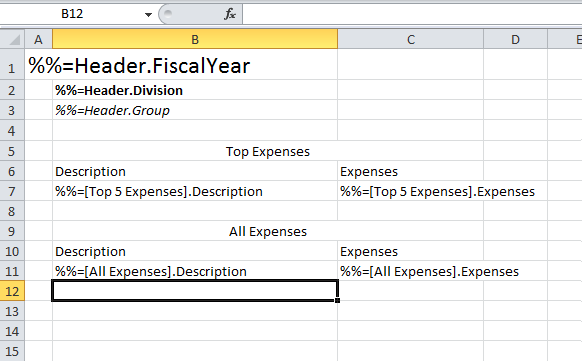
1. In the screen shot below we have made the %%=Header.FiscalYear cell font size 18, %%=Header.Division is bold, and %%=Header.Group is italic.
2. Since the 'Expenses' data will be currency values, add a currency number formatting to the cells containing the Expenses data markers. This number formatting will be repeated for each row of data that is inserted.
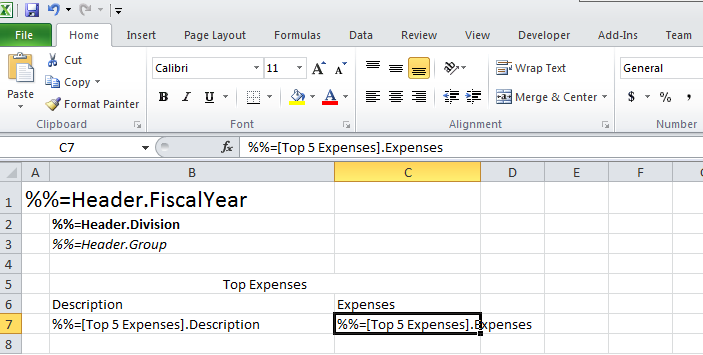
3. Add some borders to the cells in the Top Expenses and All Expenses tables. Then format the column headers as desired. Below is a screen shot of the final template:

4. Run the code with the updated template file. Here's a screenshot of the output with all the formatting applied:
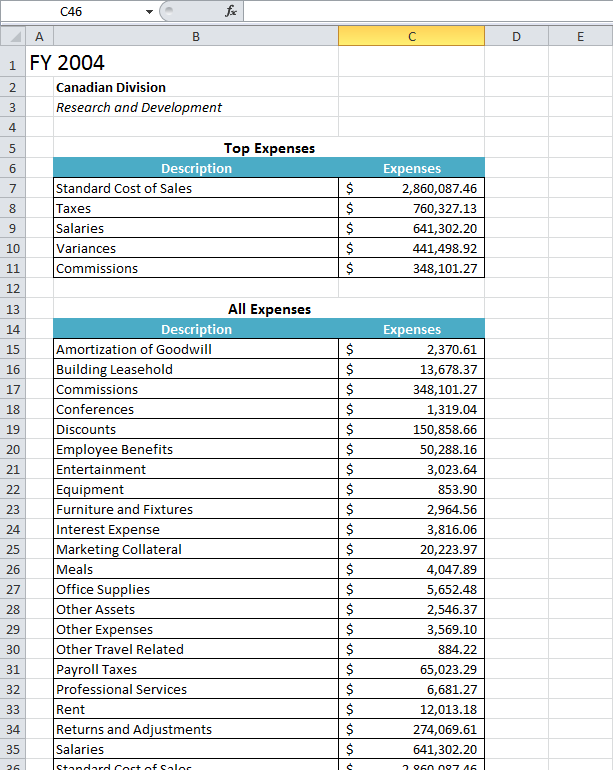
Note: The formatting has been applied to the values that replaced the data markers, including the data sets with multiple rows. Also note that the Top 5 Expenses and All Expenses tables have expanded to accommodate the new rows of data (i.e. All Expenses was pushed down when the Top 5 Expenses data was imported).
Final Code
Downloads
You can download the code for the Basic ExcelWriter Tutorials as a Visual Studio solution, which includes the Simple Expense Summary.

