Create an Excel Report from an Existing RDL
This tutorial will help you design your first report in Excel using the OfficeWriter for Excel Designer from an existing report file (RDL) that was created in Visual Studio or Report Builder. We will build a simple employee list and display some basic information about each employee.
OfficeWriter Designer Toolbar
The control center for creating reports with OfficeWriter is the OfficeWriter Designer toolbar. When you open Excel, you will the OfficeWriter Designer tab in the ribbon.

If you do not see the toolbar:
- Make sure that you ran the installer for the OfficeWriter Designer, which is a separate installer from OfficeWriter.
- If you do not see the toolbar after running the installer, the toolbar may have been disabled. Please see this OfficeWriter Answers Post for more information.
Opening a Report File
An a RDL file is an xml-based report definition file. In this tutorial we will assume the RDL was created in Visual Studio or Report Builder. If you are interested in creating RDLs with the OfficeWriter Designer, read Using MS Query in Excel to Design Reports.
- Open Microsoft Excel
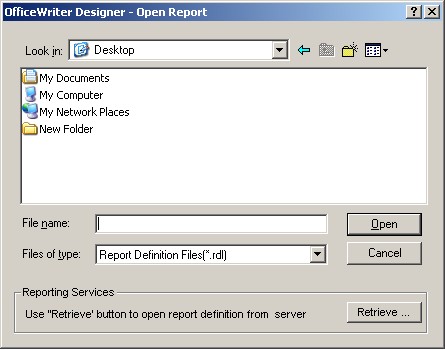
- Go to the OfficeWriter Designer tab and click Open Report
- If your report defintion file was saved on a local or network drive, navigate to the folder containing the file, select it, click Open, and continue to Adding Fields to your report
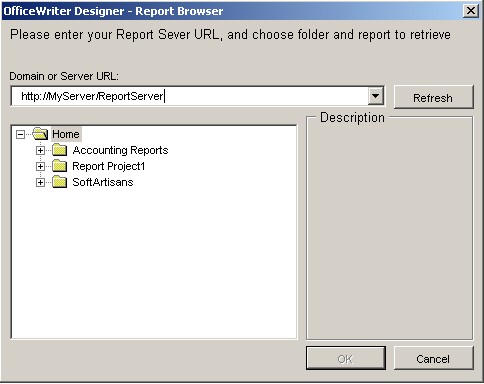
If your RDL file was deployed to Reporting Services, click the Retrieve on the bottom right corner of the dialog box.

- In the Report Browser dialog box, type in your report server's URL or Domain name and click Refresh. This will load all the available report folders into the list box. Navigate to your report file, select it, and click Ok.

Adding Fields to Your Report
When you open the report, the Designer parses the RDL for information about the data sets and makes that information available while you are working in Excel. Data sets will appear in a drop-down list and you will be able to insert fields from those data sets into the Excel template as data placeholders called data markers.
For this tutorial we will use an RDL that was created in Visual Studio containing a data set with the following query:

- Place your curse in the cell A2 and click inside it. This is where we will insert the data marker.
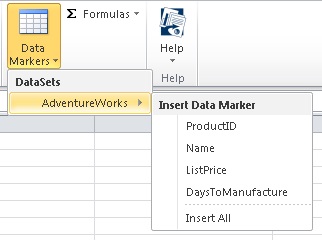
- Click Data Markers on the Designer toolbar and locate your data set from the drop-down list.

- Hover over your data set to see the fields that are available.
- Select the ProductId field to insert the data marker into cell A2. Your template should now look like this:

- Place your cursor in cell B2 cell and click inside it.
- Click Data Markers again, hover over your data set, and select the Name field. Your template should now look like this:

- Place your cursor in cell C2 cell and click inside it.
- Click Data Markers, hover over the data set, and select the ListPrice field.
- Place your cursor in cell D2 cell and click inside it.
- Click Data Markers, hover over your data set, and select the Days to Manufacture field.
- In cell A1 type Product ID, in cell B1 type Product Name, in C1 type List Price, and in D1 type Days to Manufacture.
Your finished report template should look like this:

Publish and View Your Report
Before publishing the report on the Reporting Services server, we must save the Excel template locally as an RDL file.
- From the OfficeWriter Designer toolbar select Save. You will have the option to Save to Disk or Deploy to Remote Server.
- Select Save to Disk.
- Navigate to a local folder where you will store the template report file. This will be where you store your work file in case you want to edit it later, not a location on the Reporting Services server.
- Save the template as an RDL file.
- To publish the report, from the toolbar, click Save and select Deploy To Remote Server.
- From the Publish dialog box select the drop-down to display the Server or URL.
- If the dropdown contains the server you need, select it.
- If you have never browsed to the server from the designer before, you will need to manually enter the URL the first time
- Use the Web Service URL, which can be found in the SSRS Configuration Manager on the report server. It usually looks something like this: http://<servername>/ReportServer, or if there is a named instance of SQL Server, http://<servername>/ReportServer_IntanceName
- If you have never browsed to the server from the designer before, you will need to manually enter the URL the first time
- Click Refresh.
- Select a folder for which you have publish rights and click Ok.
- If your report published with no errors, you will receive a Publish Successful message dialog. Click Ok to continue.
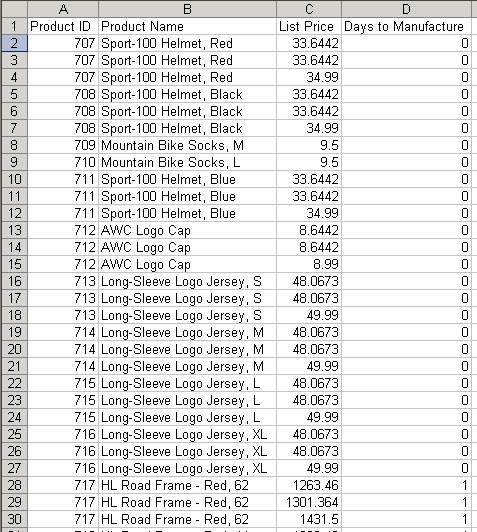
- To view the report, click View on the OfficeWriter Designer. The report viewer will open another Excel window with the report results. It should look like this:

Select Close Report View to return to your report template.
To verify that your report is actually running on Reporting Services:
- Open a browser and go to the Reporting Services Report Manager (usually installed at http://<server address>/Reports).
- Navigate to where you published your report.
- Select the report. Reporting Sevices will display the report but only show you the data set.
- From the export option drop-down, choose Excel designed by OfficeWriter.
- When prompted, click Open . Excel will open and display your report the way you created it.

