
.
The OfficeWriter 8 installer is available in 64-bit (OfficeWriter-Installer-8.#.#-x64.msi) and 32-bit (OfficeWriter-Installer-8.#.#-x86.msi).
There is only one installer (available in 32 or 64 bit) which handles installing any OfficeWriter components (including ExcelWriter, WordWriter, and SSRS integration). To run the installer for the OfficeWriter SSRS integration, follow the Installing for SSRS instructions.
Double click the msi to begin installing OfficeWriter for .NET:
Unable to render embedded object: File (welcome_ow.png) not found.
Note: If you have a previous version of OfficeWriter installed, you may be prompted to upgrade or remove the existing version of OfficeWriter. We recommend that you follow the steps to remove the previous version of OfficeWriter before continuing with your installation.
Click Next.
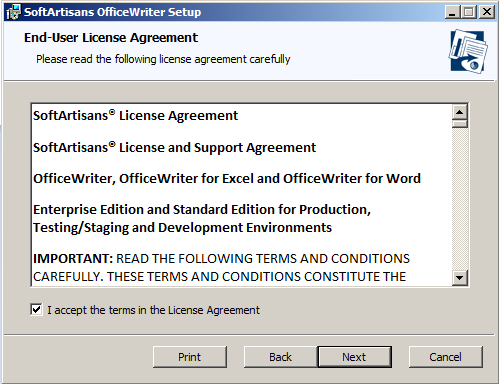
Read the End-User License Agreement and click Next when finished.
Click Next.
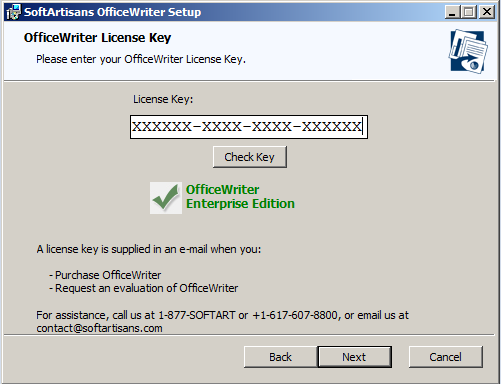
You will be prompted for a license key. Enter a license key into the box and click Check Key.
Unable to render embedded object: File (licensekey_ow.png) not found.
The installer will confirm what edition (Standard or Enterprise) the license key is. Once the license key is verified, the Next button will be enabled.
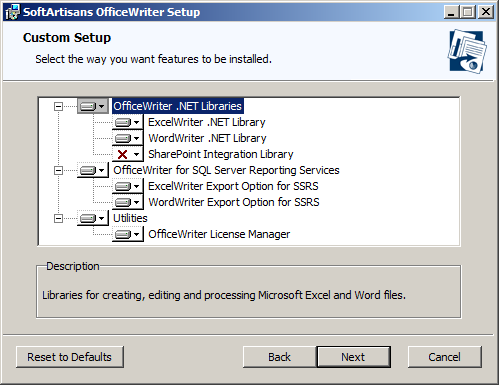
You will need to select the components to install. To include or exclude any components from your installation, click on the drop-down next to the component.
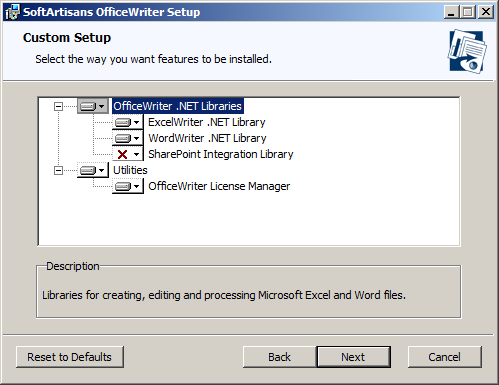
The components that are available for installation are based on the license key that was provided earlier. If you run the installer on a machine that has SQL Server Reporting Services installed, the installer will make the SSRS integration available.
The destination folder is where the OfficeWriter assemblies and utilities will be unpacked. By default, the destination folder will be C:\Program Files\SoftArtisans\OfficeWriter.
Unable to render embedded object: File (location_ow.png) not found.
The OfficeWriter installer requires administrative privileges to write the license key to the registry. You will be prompted for administrative credentials before the installation begins.
Unable to render embedded object: File (ready_ow.png) not found.
Click Install to start the installation. This will register the license key provided earlier and unpack the following files:
Installation Files
||
|
|
Softartisans.OfficeWriter.ExcelWriter.dll |
|
|
|
Softartisans.OfficeWriter.WordWriter.dll |
|
|
|
LicenseManager.exe |
Manage, add, and remove license keys for OfficeWriter. |
|
|
SoftArtisans.OfficeWriter.ExcelWriter.SharePointIntegration.dll |
SharePoint Specific Functions (EE only) |
1. Follow the instructions above to perform the automatic installation on a separate machine. This will unpack the assemblies and utilities needed to perform a manual installation.
2. Copy LicenseManager.exe and SoftArtisans.OfficeWriter.ExcelWriter.dll or SoftArtisans.OfficeWriter.WordWriter.dll to the new machine.
3. Open LicenseManager.exe to add the new license keys to the registry.
Writing to the registry requires administrative privileges. If you are using a newer operating system (Windows Vista, Windows 7, or Windows Server 2008), you will need to right click LicenseManager.exe and select Run as Administrator.
