This tutorial will help you design your first report in Word using the OfficeWriter for Word Designer from a report file created in Visual Studio or Report Builder. To follow this demonstration you need the AdventureWorks sample database, which is an optional component in the Reporting Services installation.
We will build a simple employee list and display some basic information about each employee.
The control center for creating reports with OfficeWriter is the OfficeWriter Designer toolbar. When you first start Word, you will see the toolbar directly underneath the Word toolbar at the top of your document.

If you do not see the toolbar:
- Open Word's View menu and select >Toolbars > OfficeWriter.
# Check OfficeWriter. If OfficeWriter is not listed, run the OfficeWriter client installer.
If your toolbar does not contain query-building buttons (Add Query, Edit Query, etc.), your registry settings have been set to disable MS Query. These buttons are not required for this tutorial, so you do not need to make any changes to your installation.
Step 1. Open an RDL File
An a RDL file is an xml-based report definition file. We will open an RDL file created in Visual Studio. The file contains a database connection and a query. The query fields will appear in a drop-down list on the OfficeWriter toolbar. You will be able to insert these fields as merge fields (data placeholders) in the report template. You will not be able to create additional queries.
- Open Microsoft Word and create a new file.
# Click the Open Report button on the OfficeWriter toolbar.
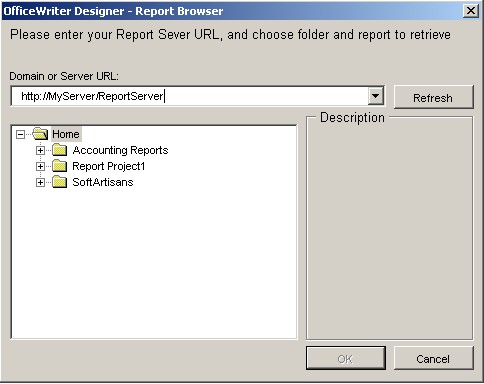
# If your report definition file was saved on a local or network drive, navigate to the folder containing the file, select it, click Open, and continue to step 2. If your report definition file was deployed to Reporting Services, click the Retrieve on the bottom right corner of the dialog box, and continue to step 3.
!ww_FirstfromRDL1.jpg!
# In the Report Browser dialog box, type in your report server's URL or Domain name and click Refresh. This will load all the available report folders into the list box. Navigate to your report file, select it, and click Ok.
Step 2. Add Merge Fields to Your Report
For this demonstration we will use a report file created in Visual Studio containing the following query:

After opening your report in Word with the OfficeWriter toolbar, you should find your query listed under the Select Query button.
- Place a two column, two row table in your report template.
!ww_FirstfromRDL6.jpg!
# Click Select Query on the OfficeWriter toolbar and select your query from the drop-down list.
!ww_FirstfromRDL4.jpg!
# Place your cursor in the top left cell of the table click inside it.
# Click Insert Merge Field and select the LastName field. Your report should now look like this:
!ww_FirstfromRDL7.jpg!
# After the AdventureWorks.LastName field, type in a comma and a space. Select Insert Merge Field again and pick the FirstName field. Your report should look like this:
!ww_FirstfromRDL8.jpg!
# Place your cursor in the top right cell of the table. Select Insert Merge Field and pick Title.
# In the bottom left cell, type Employee ID: and insert the EmployeeID field.
# Place your cursor in the bottom right cell of the table. Click Insert Merge Field and select EmailAddress.
Your finished report template should look like this:

Step 3. Set a Query Range
The range of a query specifies whether all or just the first record returned by the query will be displayed in the report. See Setting Query Range section for a detailed explanation of query range.
There are two different query ranges: Document and Selection. If a query's range is document, only the first record returned by the query will be displayed in the report. If the range is selection, all records returned by the query will be displayed in the report.
- Click Select Query on the OfficeWriter Designer and choose your query from the list.
# With your mouse highlight the entire table on your report. Select not only the table, but also include a blank row below the table.
!cfwr_figure11.jpg!
# Select Query Range from the OfficeWriter Designer.
# Make sure that Selection is chosen and click Ok .
Step 4. Publish and View the Report
- From the OfficeWriter Designer toolbar select Save As.
# Navigate to a local folder where you will store the template report file. This will be where you store your work file in case you want to edit it later, not a location on the Reporting Services server.
# Save the template as an RDL file.
# To publish the report, from the toolbar, select Publish.
# From the Publish dialog box select the drop-down to display the Server or URL.
# Choose the server on which Reporting Services is installed.
# Click Refresh.
# Select a folder for which you have publish rights and click Ok.
# If your report published with no errors, you will receive a Publish Successful message dialog. Click Ok to continue.
# To view the report, click View on the OfficeWriter Designer. The report viewer will open another Word window with the report results. It should look like this:
!ww_FirstfromRDL12.jpg!
# Select Close Report View to return to your report template.
To verify that your report is actually running on Reporting Services:
- Open a browser and go to the Reporting Services Report Manager (usually installed at http://<server address>/Reports).
# Navigate to where you published your report.
# Select the report. Reporting Sevices will display the report but only show you the data set.
# From the Select a format drop-down, choose Word designed by OfficeWriter.
# Click Export and - when prompted - Open . Word will open and display your report the way you created it.
Samples
Download an RDL file with each result displayed in a separate Word table.
Download an RDL file with all results displayed in one Word table.

