Table of Contents |
|---|
Introduction to ExcelApplication API
This tutorial assumes that the coder knows how to set up an Excel Template using data markers and Excel cell formatting. The .XLSX template file is available here.
ExcelTemplate vs. ExcelApplication
This tutorial opens an Excel file formatted as an ExcelTemplate origin file (i.e. it contains formatted data markers) using ExcelApplication object. This means that the file can be copied based upon the user's specification using the ExcelApplication CopySheet method. This method copies a worksheet (including its formatted data markers) to another location in the workbook. The method has three parameters:
- A Worksheet object representing the sheet to be copied,
- An integer representing the new worksheet's position and,
- The string representing the name of the new worksheet.
Setting up the template
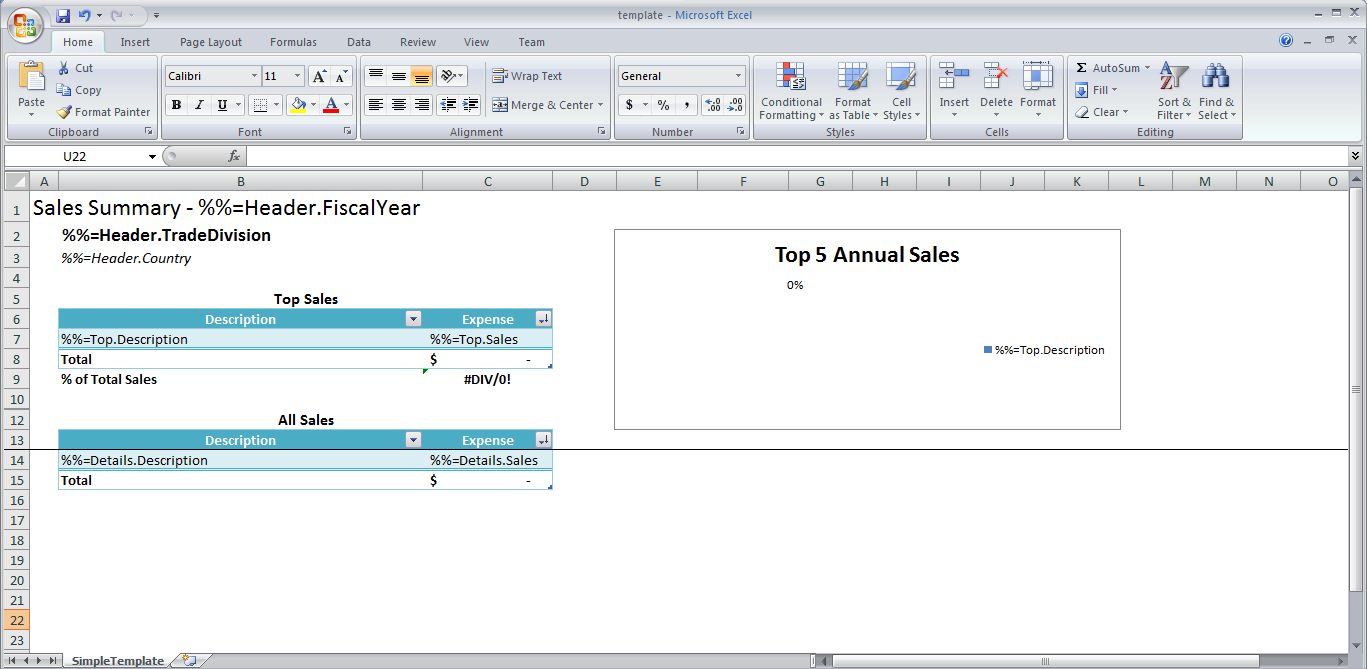
The template file should look something like this:

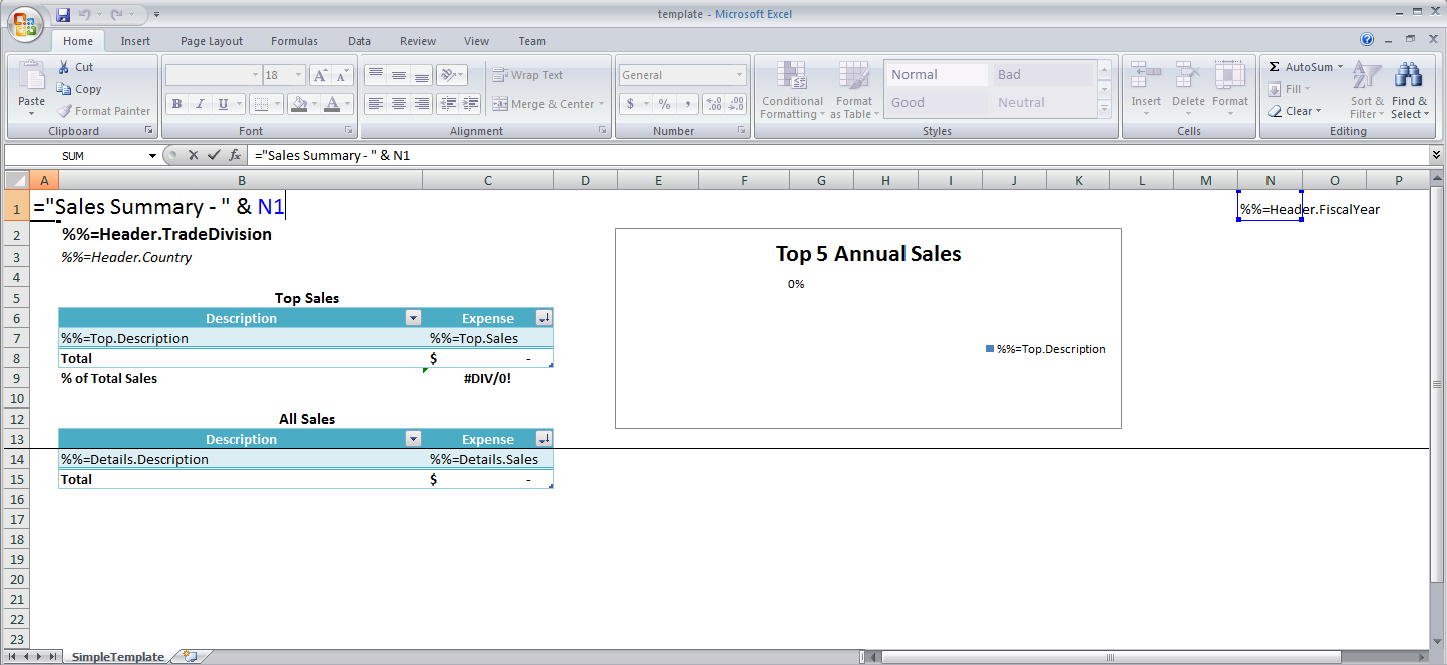
One advanced data marker format has been used in the above template. The data marker entitled Sales Summary - %%=Header.FiscalYear references another cell for the content. The below image is the data marker that was input and is how ExcelWriter will identify the appropriate fields to bind data.

Cell N1 was hidden by using a custom format where the field was filled with ';;;'.
Adding an ExcelWriter Reference in Visual Studio
Create a .NET project and add a reference to the ExcelWriter library.
- Open Visual Studio and create a .NET project.
- The sample code uses a web application.
- Add a reference to SoftArtisans.OfficeWriter.ExcelWriter.dll
- SoftArtisans.OfficeWriter.ExcelWriter.dll is located under Program Files > SoftArtisans > OfficeWriter > dotnet > bin
Writing the Code
The code for this report uses two functions- the Main function and the BindCountryData functions. The Main function calls the BindCountryData function taking each country's worksheet as a parameter. See below for further explanation.
Main function
1. Include the SoftArtisans.OfficeWriter.ExcelWriter namespace in the code behind
2. In the method that will run the report, instantiate the ExcelApplication object.
3. Open the ExcelApplication object with the ExcelApplication.Open() method and instantiate it as a Workbook object.
4. Assuming that you taking the selections from a ASP.NET ListBox, use the following utility method to create a string list of all the countries that were selected.
5. ExcelApplication can make copies of a specified worksheet using the Worksheets.CopySheet() method. This method requires a Worksheet object representing the sheet to be copied; an integer representing the new worksheet's position and, the string representing the name of the new worksheet.
Insert the following code that iterates through the selected countries in the string list to make copies of the "SimpleTemplate" in the original template.xlsx file. Each new worksheet is placed after the "SimpleTemplate" sheet and is named based on the selected country from the string list. The <i>for<i> loop uses the <i>List<i>.Count method to determine how many copies must be made.
6. At this point, there is a worksheet named after each selected country and the original worksheet contained in the wb Workbook object. We need to hide the original worksheet using the Worksheet.Visibility method. This method can also make a worksheet 'visible' or 'very hidden.'
7. Select the first worksheet after the now hidden one to be displayed when the file first is opened using the Worksheets.Select() method.
8. Instantiate a new ExcelTemplate object.
9. Open the ExcelApplication workbook using the ExcelTemplate.Open(ExcelApplication, Workbook) method.
10. The use of function in an ExcelWriter code file is sometimes the most efficient way to approach a situation. In this case, a separate function is created to bind the data. This function is called in a for loop that is contained with the other code. Let the function that deals with data binding be called BindCountryData() and takes a worksheets name's as a string parameter.
11. Call ExcelTemplate.Process() to import all data into the file.
12. Call ExcelTemplate.Save to save the output file.
ExcelTemplate has several output options: save to disk, save to a stream, stream the output file in a page's Response inline or as an attachment.
BindCountryData function
1. Create a function called BindCountryData that takes a string parameter called selection.
2. Create a DataBindingProperty based on the Worksheet name. DataBindingProperties is like a tag used to specify how data is bound to a worksheet.
Other DataBindingProperties include MaxRows and Transpose.
3. Create an string array for the header values and a string array for the column names.
ExcelTemplate can be bound to numerous types of .NET data structures: single variables, arrays (1-D, jagged, multi-dimensional), DataSet, DataTable, IDataReader etc. The source of the data can come from anywhere.
Some of the aforementioned structures have built in column names, such as the DataTable. When working with arrays, which don't have built in column names, you have to define the column names in a separate string array.
4. Use the ExcelTemplate.BindRowData method to bind the header data to the data markers in the template file (%%=Header.FiscalYear, %%=Header.TradeDivision, %%=Header.Country).
BindRowData() binds a single row of data to the template, but the data markers in the template do not need to be in a single row.
5. Get the data for the Top 5 Expenses and All Expenses data sets.
In this tutorial, it is assumed that your machine is equipped with AdventureWorks2008R2, and therefore that a SQL query is a valid operation. As a utility method, the following function will be included as a function outside of the Main and BindCountryData functions.
6. Use ExcelTemplate.BindData to bind the data for the Top and Details Sales data sets.
Recall that the data source names (Top, Details) need to match the data marker names exactly.
7. Now you may run your code.
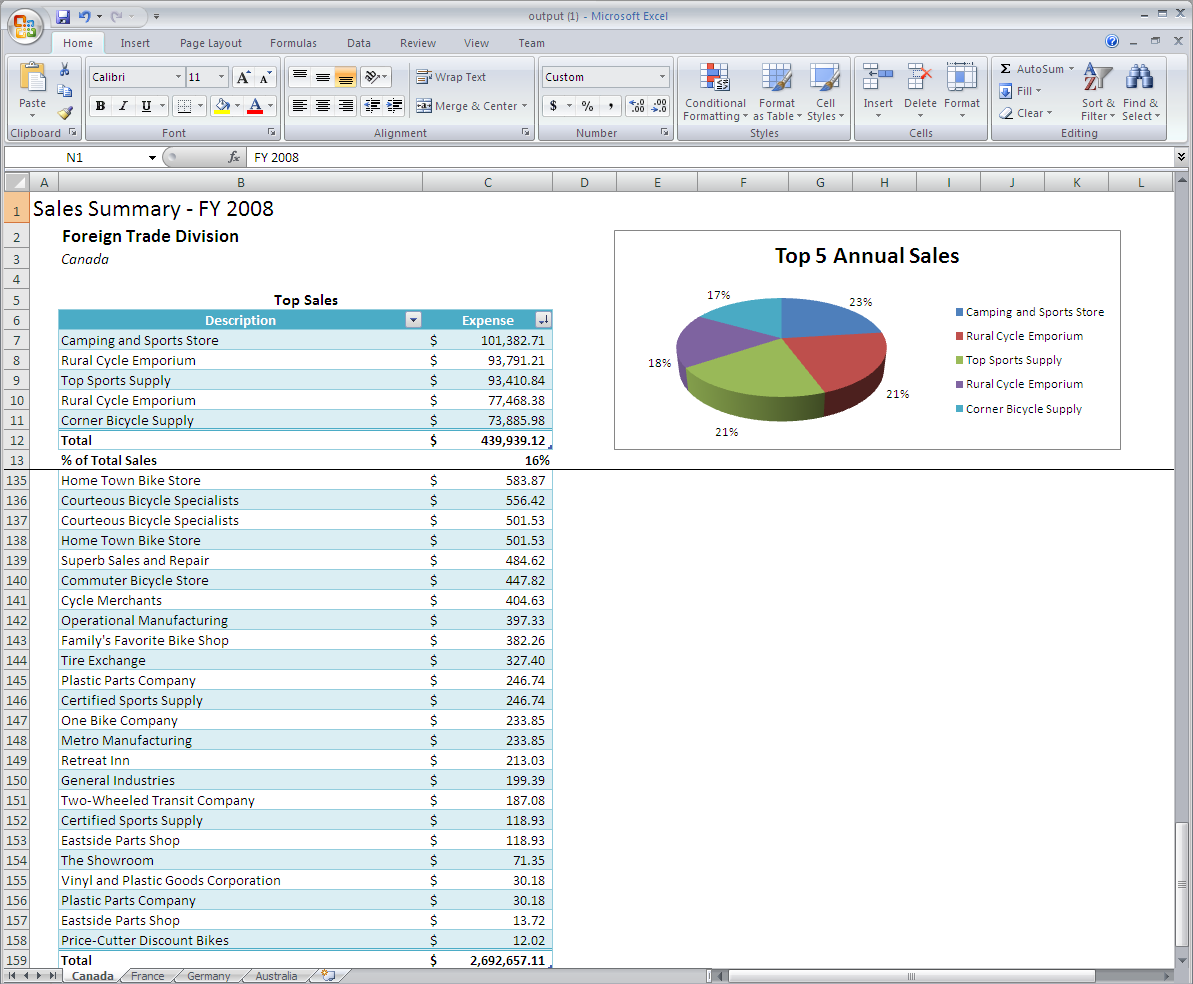
Here is an example of what the sample will look like:

Note that there are multiple worksheets, each named for each country and containing it's specified data.
Final Code
Downloads
You can download the code for the Extended Sales Summary here.
